A dull knife is more dangerous than a sharp one — it slips, it needs force, and force plus slipping equals stitches. Learning how to sharpen kitchen knives safely at home is one of the highest-value kitchen skills there is, and it’s far less intimidating than it looks. I sharpened my first knife on a cheap whetstone in about 20 minutes, and I’ve never paid for the service since.
Here’s the full picture: the difference between honing and sharpening, the whetstone technique step by step, and the safety habits that keep all ten fingers intact.
Honing vs Sharpening: Know the Difference
That long steel rod in your knife block doesn’t sharpen — it hones. Honing straightens the microscopic edge that’s folded over from use; it doesn’t remove metal or create a new edge. Run your knife along the honing steel a few times before each use (about a 15-degree angle, light pressure, alternating sides) and your knife stays aligned between real sharpenings. It’s maintenance, not repair.
Sharpening actually grinds a new edge by removing metal, and you need it when honing stops helping — the classic test is slicing a tomato. If the knife squashes the tomato instead of biting in, it needs sharpening, not honing. Most home cooks need to truly sharpen 2 to 4 times a year with regular honing in between. Understanding this distinction saves you from buying gadgets you don’t need and frustration when honing ‘doesn’t work’ on a genuinely dull blade.
How to Sharpen Kitchen Knives Safely With a Whetstone
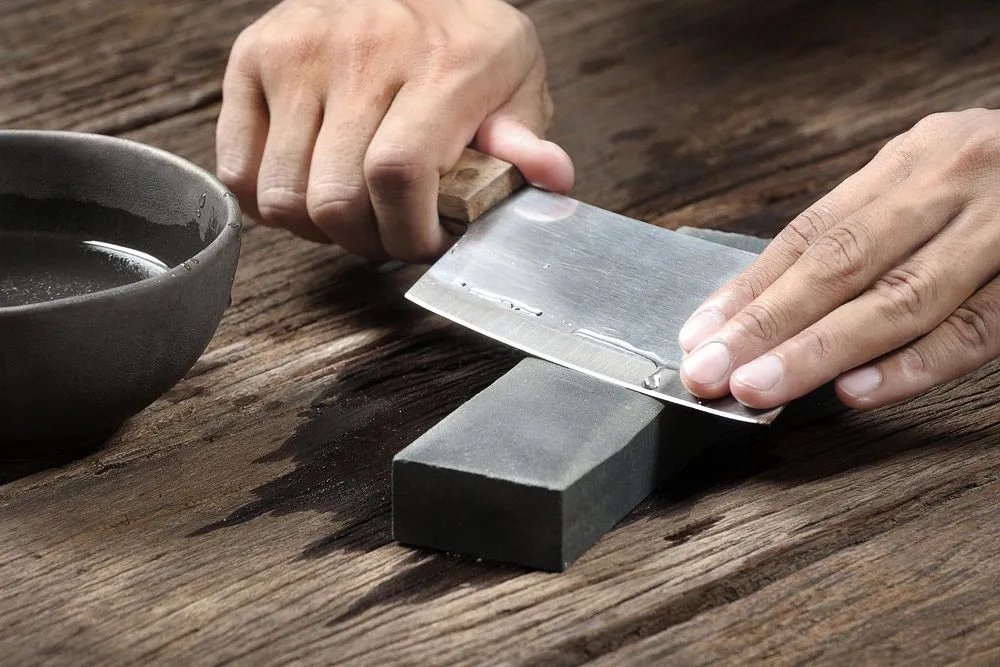
A combination whetstone (1000/6000 grit) costs about $30 and is the gold standard. Soak it in water for 5 to 10 minutes until the bubbles stop. Place it on a damp towel so it can’t slide — a moving stone is how accidents happen. Hold the knife at roughly a 15 to 20 degree angle to the stone (about the thickness of two stacked quarters under the spine is a handy visual guide).
With moderate pressure, push the blade across the stone as if you’re shaving a thin layer off, sweeping from heel to tip. Do 5 to 10 strokes on one side, then flip and repeat. You’ll feel a slight burr — a tiny wire edge — form on the opposite side; that tells you you’re actually sharpening. Then move to the fine 6000-grit side and repeat with lighter pressure to polish. Finish with a few strokes on the honing steel. Test on paper: a sharp knife slices cleanly without tearing. Throughout all of this, the safety rules are simple: stable stone, fingers curled away from the edge, slow controlled strokes, and never test sharpness by running your thumb along the blade — the paper test exists for a reason.
- Soak stone 5-10 min; set on damp towel so it can’t move
- Hold blade at 15-20° (two quarters under the spine)
- 5-10 strokes per side on coarse grit, lighter on fine grit
- Feel for the burr, then polish it off
- Paper test to verify; hone on steel to finish
Pull-Through Sharpeners: The Easier Option
If the whetstone feels like too much, a pull-through sharpener is a legitimate shortcut. Draw the knife through the coarse slot 5 to 10 times, then the fine/ceramic slot a few times, using even pressure and pulling straight back — never push forward. They’re faster and nearly foolproof, and for most home cooks the edge is plenty sharp.
The tradeoff: pull-throughs remove more metal than necessary and can scratch the blade’s sides, so they shorten a knife’s lifespan over many years. For a $30 knife you don’t care about, that’s irrelevant. For an expensive Japanese chef’s knife, learn the stone. Either way, what matters most is that the knife gets sharp — a sharp cheap knife outperforms a dull expensive one every time, whether you’re slicing apples for lunchboxes or breaking down vegetables.
Knife Safety Habits That Prevent Cuts
Sharpening safety extends to everyday use. Always cut on a stable board (damp towel underneath), curl your fingertips under in the ‘claw grip’ so your knuckles guide the blade, and never leave knives in a sink full of soapy water where a reaching hand finds the edge. Store knives on a magnetic strip or in a block — loose in a drawer, they dull each other and ambush you.
Dry knives immediately after washing rather than air-drying; water spots lead to corrosion on carbon steel, and a wet handle is a slippery handle. And respect the knife’s limits — it’s not a can opener, a screwdriver, or a box cutter. The Consumer Product Safety Commission tracks thousands of knife injuries yearly, and nearly all of them come from dull blades, rushing, or misuse rather than sharpness itself.
How Often to Sharpen Kitchen Knives Safely at Home
Knowing how to sharpen kitchen knives safely at home raises the follow-up question: how often? For a home cook using their chef’s knife daily: hone before each use (30 seconds), sharpen on a stone or pull-through every 2-3 months. Less frequent cooks can stretch to twice a year. The tomato test never lies — when honing no longer restores the bite, it’s sharpening time.
Protect your edges between sharpenings and you’ll sharpen less often. Never put good knives in the dishwasher (the heat, detergent, and rattling dull edges fast) — hand wash and dry immediately. Cut on wood or plastic boards, never glass, ceramic, or stone, which roll edges on contact. Store on a magnetic strip or in blade guards, not loose in a drawer. These habits can double the interval between sharpenings, which means less metal removed over the knife’s life and a blade that lasts decades. A quality chef’s knife, maintained this way and used with proper technique for daily prep, becomes a lifetime tool rather than a disposable one.
The Bottom Line
Hone often, sharpen 2 to 4 times a year on a whetstone (or with a pull-through for speed), keep the stone stable and your strokes controlled. That’s how you sharpen kitchen knives safely at home — and a sharp knife makes every other kitchen task easier and safer.